Pharmacy POS management
User Documentation
Dashboard
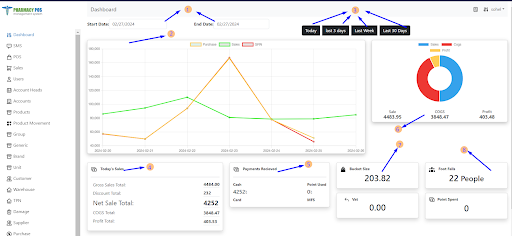
- Select start time and end time.
- View the line chart for purchase, sales and GRN.
- View the previous purchase, sales and GRN details
- Day wise sales details
- Payment received details
- Total bucket size (average purchase amount per transaction).
- Total footfall (number of visitors)
SMS
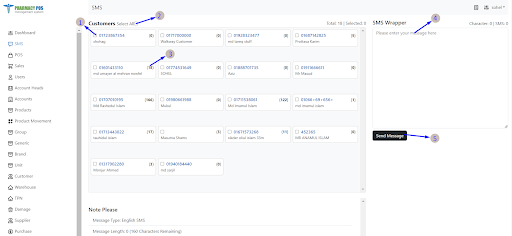
- Select Customer for SMS
- Select all customer for SMS
- Total purchase
- Write a text for customer
- Send message
To send an SMS to a customer, users need to access the SMS module. Within this module, users can select individual customers and compose messages. Once the message is written, they can send it by clicking the "Send" button.
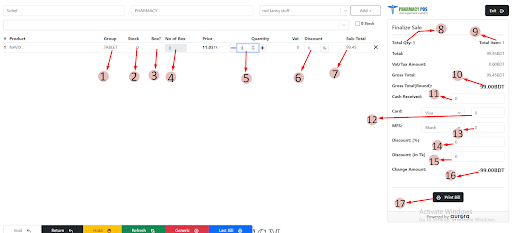
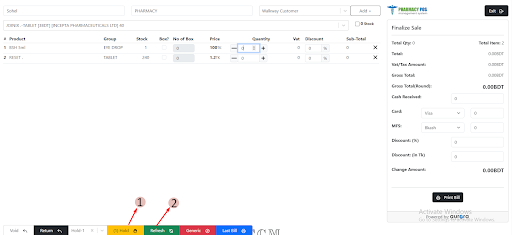
POS MODULE’S

This is a Point of Sale screen, designed to facilitate easy sales transactions for users.
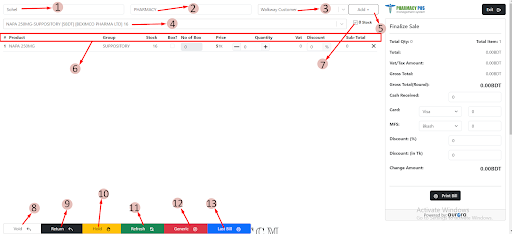
- User name
- Outlet name
- Customer name or number search and selected customer
- Select Product name
- Add new customer details
- Header Text
- Serial name
- Product name
- Group
- Stock
- Box
- Number of Box
- Price
- Quantity
- Vat
- Discount
- Sub Total
- Cancel
- Select 0 stock
- Void
- Return
- Hold
- Refresh
- Generic
- Last bill
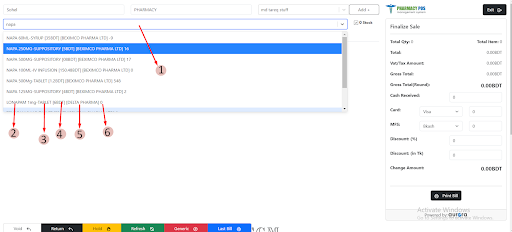
- Search product name
- Product Name
- Group Name
- Product Sale MRP BDT
- Supplier Name/ Vendor Name
- Product Stock
- Group name
- Product stock
- “Check box” box system quantity.
- 1 box= total pieces quantity ,2 box= total pieces quantity
- Total quantity pieces
- One item discount in percentage
- Total MRP price in this product item
- All Product item Qty
- Item Quantity
- Total price without discount
- Customer price received amount.
- Bank payment amount box
- Mobile banking payment amount box
- Discount in percentage all item product
- Discount in all percentage taka
- Customer Total price without discount
- Print billing customer invoice
A POS, short for point of sale, is where businesses and customers make transactions. This can be at a store's checkout counter or online. It's where you buy things in exchange for payment.
This POS module where users can input any product name. The system displays the serial number, product name, stock, box, number of boxes, price, quantity, VAT, discount and total price. Users have the flexibility to adjust the number of boxes and quantity as needed. Finally, it displays a finalized sales report for users.
Users can easily identify products that are out of stock by selecting the zero stock option.
Add Customer
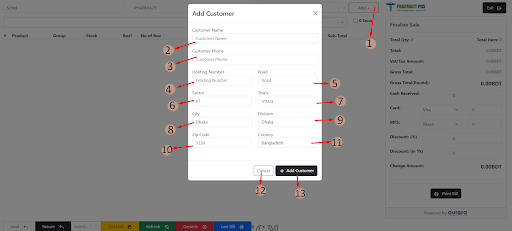
- Add customer
- Enter the customer name
- Enter the customer phone number
- Enter the holding number
- Enter the Road number or Road name
- Enter the sector number
- Enter the town
- Enter the city
- Enter the division
- Enter the zip code
- Enter the country name
- Cancel
- Create a new customer
Users have the option to add customers directly within the POS modules. Additionally, they can create a new customer by inputting various details including name, username, phone number, email, membership status, holding number, road, sector, town, city, division, zip code, county, types, and status.
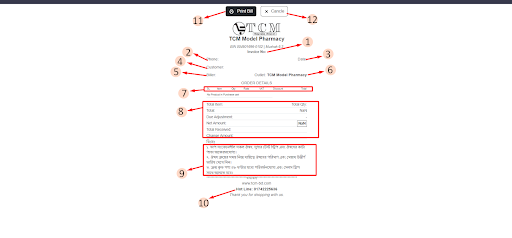
Customer's Receipt
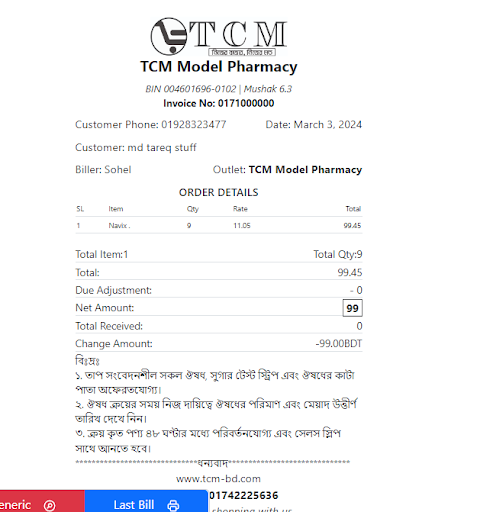
This is the customer's receipt, containing information about the products the customer has purchased, along with accompanying conditions.
Void Return
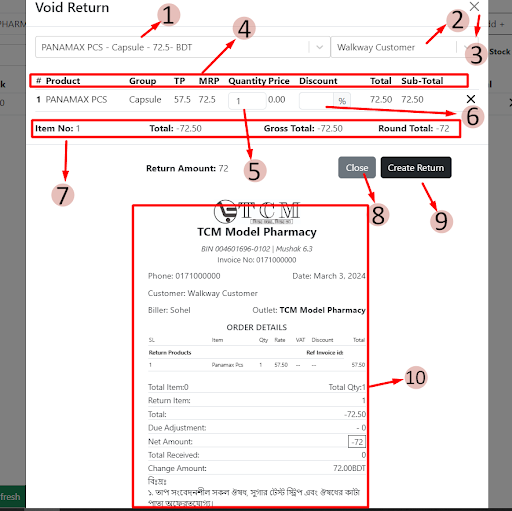
- Select product name
- Customer name or number search and selected customer
- Cancel
- Headers text (1)
- Serial number
- Product name
- Group
- TP
- MRP
- Quantity
- Price
- Discount
- Total
- Sub-total
- Adjust quantity
- Discount
- Headers text (2)
- Item no
- Total
- Gross total
- Round total
- Close
- Create return
- Void return preview with invoice
If a customer wishes to return a product, users should utilize the void return option. After selecting this option, users can input the product name. Upon selecting the product name, users can access details such as serial number, product name, group, TP, MRP, quantity, price, discount, total, sub-total, item number, total, gross total, and return total. Users have the flexibility to adjust the discount and quantity as needed. After providing all the necessary information, users will be able to process the return amount.
Return with Invoice

- Scan invoice ID
- Headers text (1)
- Client phone number
- Biller name
- Date
- Old
- New
- Item no
- Total
- Vat
- Round total
- New
- Headers text (2)
- Serial number
- Product name
- Price
- Quantity
- Vat
- Sub-total
- Selection box
- Cancel
- Create return
Users have the option to return products to customers using the invoice ID if desired. To initiate the return process with the invoice ID, the user must first navigate to the return option. Upon selecting the return option, the user enters the invoice ID in the scan invoice field. Once the invoice ID is entered, the user will be presented with details such as Bill Name, Date, Item Total, VAT, Old, Round Total, New, Serial Number, Product Name, Price, Quantity, VAT, Sub Total Oil, and Return. After these options are available, the user can choose individual products or select all products together for return. Once selected, the user can complete the task by using the create return option.
Hold Product
- Users have the option to put products on hold.
- Users can clear products upon refreshing the screen.
If a user needs to place a product on hold, they must click the hold button. This button is utilized to reserve a product. By placing a product on hold, other items can be sold normally. To sell the held product, the user navigates to the hold option and selects the desired product. This allows the user to manage all held products effectively.
The user can easily refresh everything by using the refresh button.
Generic Wise Product Search
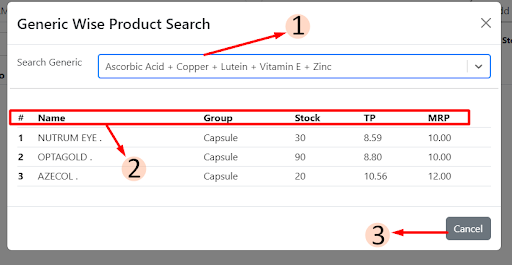
Generic Wise Product Search
- Search generic wise product
- Headers text
- Serial number
- Product name
- Group
- Stock
- TP
- MRP
- Cancel
Users can search for genetic invoice products from a POS model. To do so, users need to navigate to the generic option. Once in the generic option, users input a generic name in the generic search option. After submission, users can view all the information of that generic product together. This information includes serial number, product name, group, stock, TP, and MRP.
Last Bill
- Invoice no
- Customer phone number
- Date
- Customer name
- Biller name
- Outlet name
- Headers text (1)
- Serial number
- Item
- Quantity
- Rate
- Vat
- Discount
- Total
- Headers text (2)
- Total item
- Total quantity
- Total
- Due adjustment
- Net amount
- Total received
- Change amount
- Conditions for customer
- Hot line number for customer
In the "Last Product" option, users can view their most recent sale by accessing this feature. Upon selecting this option, users will obtain all the information pertaining to their last product sale. This information includes Customer Name, Phone Number, Biller Name, Outlet Name, Serial Number, Item, Quantity, Rate, Total, Total Item, Total, Due Adjustment, New Amount, Total Receive, and Change Amount.
Sales
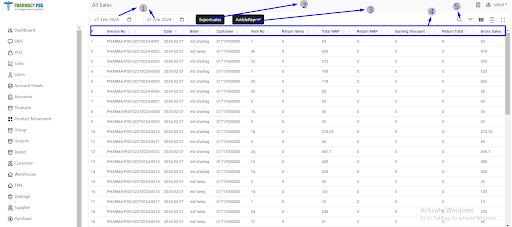
- Select a particular date
- Export sales details
- Article report details
- Text headers
- Serial number
- Invoice ID
- Date
- Biller
- Customer
- Item no
- Return items
- Total MRP
- Return MRP
- Earning discount
- Return total
- Gross sales
- Discount
- Net sales
- Net sales round
- Point Used
- Total receivable
- Total received
- Change amount
- Total TP
- Return TP
- Cash
- Card
- MFS
- Status
- Actions
View sales details
- Search button
Users Can access all sales reports here. To obtain a sales report, users need to enter their desired date range. After selecting the date range, users can view the results displayed below in a grid format. Additionally, there is an option for both sales and article reports.
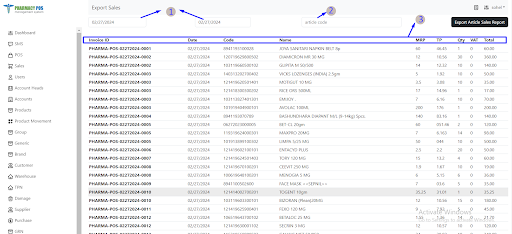
- Select a particular date
- Search button
- Text headers
- Invoice ID
- Date
- Code
- Name
- MRP
- TP
- Quantity
- Vat
- Total price
The sales report Showcases all sales details, including the Invoice ID. Users can also choose a specific date range to access this information. Upon selecting a date range, users can view details such as the Invoice ID, date, biller, customers phone number, items purchased, gross total, discount, net sales amount, payment received, charge given, status and profit.
Users
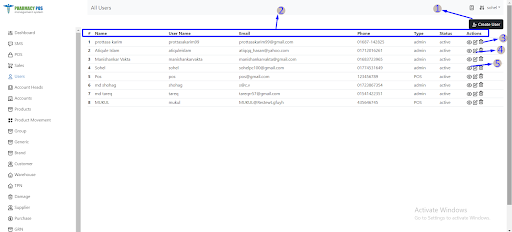
- Create User
- Text headers
- Serial number
- Name
- Username
- Phone
- Type
- Status
- Action
- Edit details
- Delete details
- View details
This module stores all user information, including names, user name, email, address, phone number, types and statuses. Additionally, users have the ability to edit and delete their information.
Create New User

- Input name
- User name
- Email address
- Phone
- Password
- Warehouse
- User type
- Status
- Cancel
- Add user
Creating a new user usually means getting their name, user name, email, phone number and any other needed information. We then put this into a system to make a unique user account. Depending on the platform, users might get a certain role or permission for access. Once the account is created, users can use the software.
Account Heads
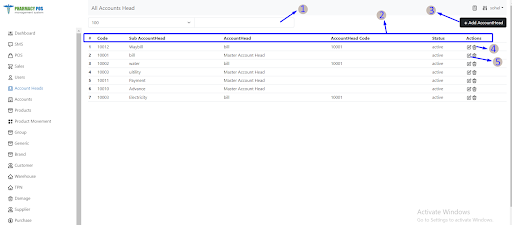
- Search button
- Text headers
- Serial number
- Code
- Sun Account Head
- Account Head
- Account Head code
- Status
- Actions
- Add account head
- Delete details
- Edit details
In accounting, an "account head" categorizes financial transactions. It's a vital part of the chart of accounts, which lists all the accounts used by an organization.
Each account head has a unique identifier and name, making it easier to organize and analyze financial data. Properly classifying transactions under these heads is crucial for accurate financial reporting, budgeting, and decision-making.
Add Account Head
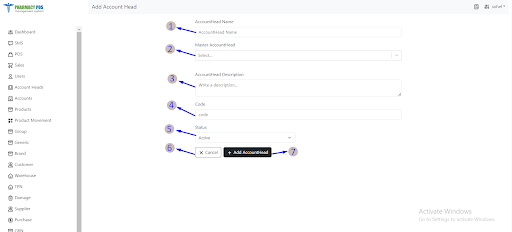
- Account Head Name
- Master account head
- Account head description
- Code
- Status
- Cancel
- Add account head
Creating a new account head typically involves obtaining the account head name, master account head, account head description, code, status, and any other necessary information. This data is then entered into a system to generate a unique account head. Depending on the platform, users may be assigned specific roles or permissions for access. This ensures that users can easily access all account head information.
Accounts
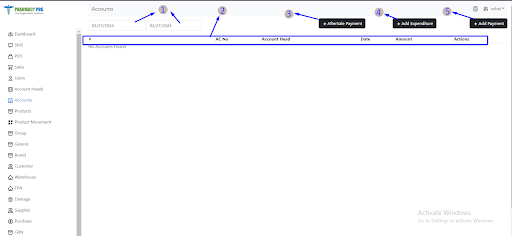
- Select a particular date
- Text headers
- Serial number
- Account no
- Account Head
- Date
- Account
- Action
- After sales payment
- Add expenditure
- Add payment
The accounts section presents previously saved details, including the serial number, account number, account head, date, amount, and actions. Users have the option to delete any information. Additionally, there is a feature for selecting a date range to retrieve this information. Once a specific date range is selected, users can access the relevant information.
After sales payment
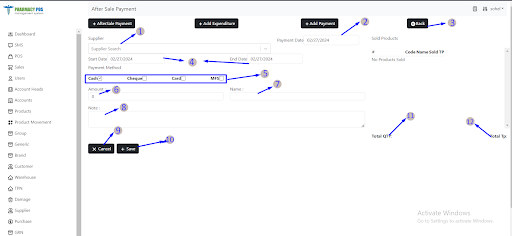
- Input supplier search
- Select payment date
- Back from page
- Select particular date
- Payment method
- Card
- Cheque
- Cash
- MFS
- Amount
- Name
- Note
- Cancel
- Save
- Total quantity
- Total TP
After a sale, customers may need extra services or support. These could involve payments through methods like cheque, cash, mobile financial services (MFS), or card. Users typically include supplier names, payment dates, and any other necessary information. the users select also a particular date for payment. Payment for these services would be considered for the customer's convenience, making it helpful for them.
Add Expenditure
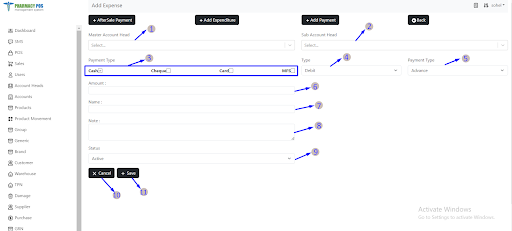
- Master account head
- Sub account head
- Payment Method
- Cash
- Chaque
- Caed
- MFS
- Type
- Debit
- Credit
- Payment type
- Advance
- Payment
- Amount
- Name
- Note
- Status
- Cancel
- Save
Add expenditures, Users can add various types of accounts here, such as entertainment, lunch, Electricity, salary, freezing, Repair etc. These may involve payments through methods like cheque, cash, mobile financial services (MFS), or card. Users typically include master account head, sub account head, type, payment type and any other necessary information. Payments for these services are considered for the users, making it helpful for them."
Add Payment
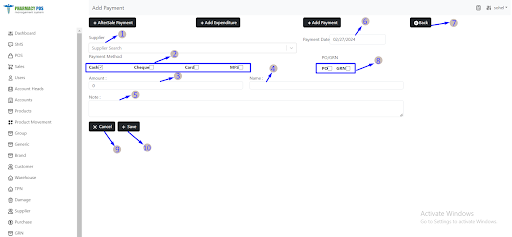
- Supplier search
- Payment method
- Cash
- Card
- Cheque
- MFS
- Amount
- Name
- Note
- Payment date
- Back
- Select PO/GRN
- Cancel
- Save
Add that payment is made to the supplier. If a user has generated a Purchase Order (PO) or Goods Received Note (GRN), they can navigate to the options and directly reconcile it with the respective PO or GRN. These payments may involve methods such as cheque, cash, mobile financial services (MFS), or card. Users typically include the supplier's name, payment date, and any other necessary information."
Products
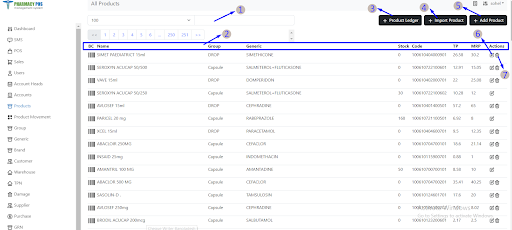
- Search button
- Text headers
- Bar code
- Name
- Group
- Generic
- Stock
- Code
- TP
- MRP
- Actions
- Product ledger
- Import Product
- Add product
- Edit details
- Delete details
Here is the complete product information. The product section displays previously saved details including Barcode, name, group, generic, stock, code, TP, MRP, and action. Users also have the option to edit and delete product details.
Product ledger
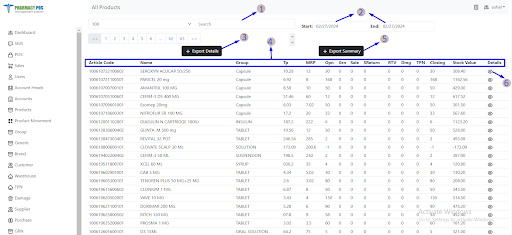
- Search button
- Select start date and end date
- Export details
- Text headers
- Article code
- Name
- Group
- TP
- MRP
- Open
- GRN
- Sale
- Sale return
- RTV
- Damage
- TPN
- Closing
- Stock value
- Details
- Export summary
- Details
Product ledger is a record-keeping system that tracks transactions and balances related to specific products or inventory items. It typically includes information such as article code, product name, group, TP MRP, opening quantity, GRN Quantity, sale, sale return, RTV quantity, damage quantity, TPN, Closing Quantity, stock value and details of transactions, prices, and current inventory levels. This ledger helps businesses maintain accurate records of their inventory movements, monitor stock levels, track costs, and analyze sales and purchasing trends.
Import Product
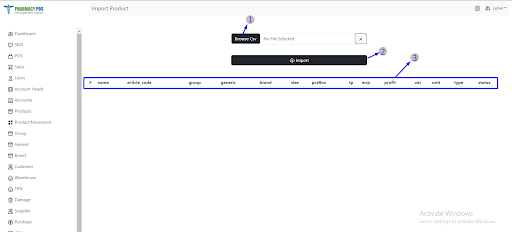
- Select Browse CSV
- Import
- Text headers
- Serial number
- Name
- Article code
- Group
- Generic
- Brand
- Size
- PCS Box
- TP
- MRP
- Profit
- VAT
- Unit
- Type
- Status
If users want to import multiple inputs simultaneously, they should use the "Import Product" feature. Within this option, they can browse for a CSV file and select it. The system then displays the serial number, name, article code, group, generic, brand, size, piece of box, TP, MRP, PRofit, VAT, unit, type and status of each product. After reviewing the information, users can click the "Import" button to proceed.
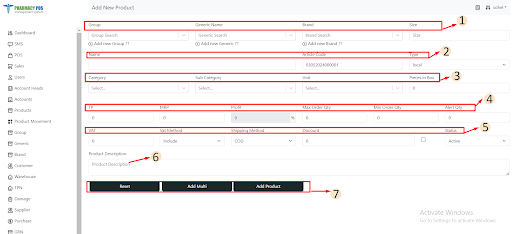
Add New Product
- Headers text (1)
- Group name
- Add new group
- Generic name
- Add new generic
- Brand name
- Add new brand
- Size
- Group name
- Headers text (2)
- Product name
- Article code
- Type
- Headers text (3)
- Category
- Sub-category
- Unit
- Pieces in box
- Headers text (4)
- TP
- MRP
- Profit
- Max order quantity
- Min order quantity
- Alert quantity
- Headers text (5)
- Vat
- Vat method
- Shipping method
- Discount
- Status
- Product description
- Headers text (6)
- Reset
- Add multi
- Add Product
To add a new product, users typically follow these steps within an inventory management system:
Fill in the required information for the new product, including group name, generic name, brand name, size, product name, article code, type, category, subcategory, unit, pieces in box, TP (Trade Price), MRP (Maximum Retail Price), profit, max order quantity, min order quantity, VAT, VAT method, shipping method, discount, and any other necessary details.
Once all the necessary information is entered, save or submit the new product. This may involve clicking a "Save" or "Submit" button, depending on the system.
Add Product
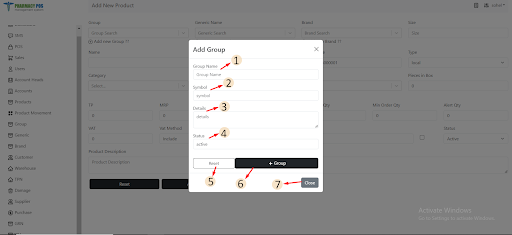
- Group name
- Symbol
- Details
- Status
- Reset
- Add group
Users can add a group by navigating to the "Add Group" option within the product modules. Upon selecting this option, users input the group name, symbol, details, and status. After entering this information, users click on the "Create New Group" button to finalize the process.
Add Generic
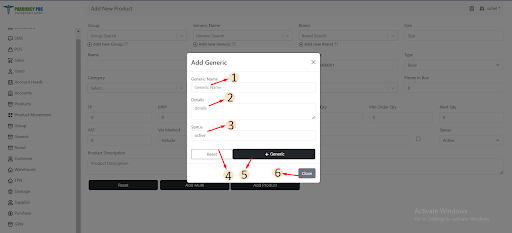
- Generic name
- Details
- Status
- Reset
- Add generic
- Close
Users can add a generic by navigating to the "Add Generic" option within the product modules. Upon selecting this option, users input the generic name, details, and status. After entering this information, users click on the "Create New Generic" button to finalize the process.
Add Brand
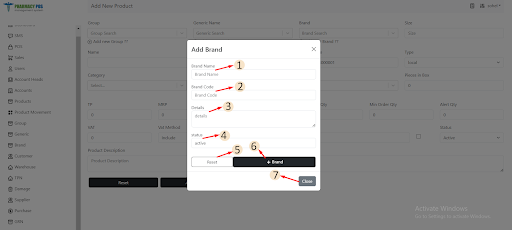
- Brand name
- Brand code
- Details
- Status
- Reset
- Add brand
- Close
To add a brand, users navigate to the "Add Brand" option within the product modules. Upon selection, users input the brand name, brand code, details, and status. After entering this information, users finalize the process by clicking on the "Create New Brand" button.
Product Movement
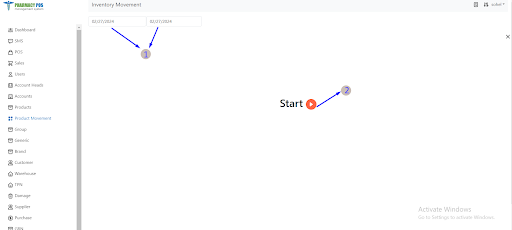
- Select a particular date
- Start
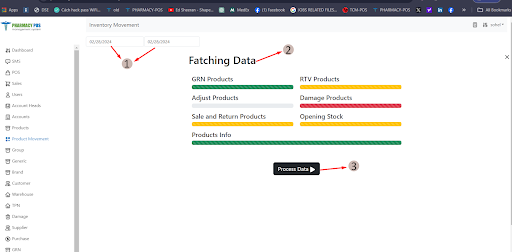
- Select start date and end date
- Fetching data
- Process data
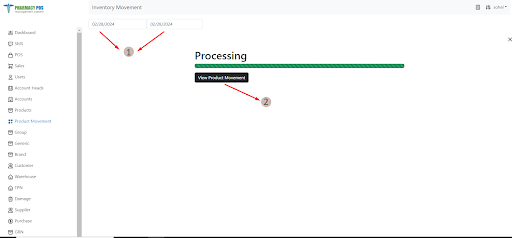
- Select start date and end date
- View product movement
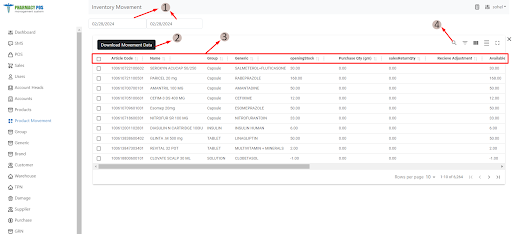
- Select start date and end date
- Download movement data
- Text headers
- Serial number
- Article code
- Name
- Group
- Generic
- Opening Stock
- Purchase quantity (GRN)
- Sales return quantity
- Receive adjustment
- Available stock
- Sale quantity
- RTV quantity
- Damage quantity
- Issue adjustment
- Closing stock
- TP
- Stock value
- Search button
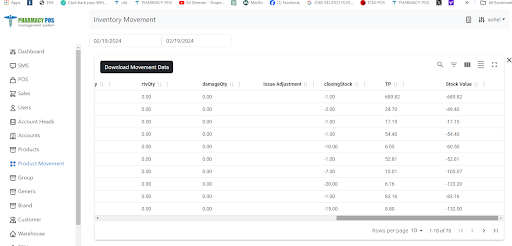
Users will have access to all data related to product movement, which involves the transfer of goods from one location to another. Efficient product movement is essential for businesses to meet customer needs, cut costs, and manage inventory effectively. Users can specify a date range to retrieve information. When selecting a specific day, they will receive details such as article code, name, group, generic, opening stock, purchase quantity, sales return quantity, received adjustment, available stock, sale quantity, RTV quantity, damage quantity, issued adjustment, closing stock, TP, and stock value.
Group
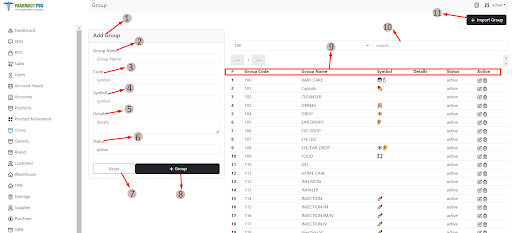
- Creating group
- Group name
- Code
- Symbol
- Details
- Status
- Reset
- Add Group
- Text headers
- Serial number
- Group code
- Group name
- Symbol
- Details
- Status
- Action
- Edit details
- Delete details
- Search button
- Add import group
The Group section showcases previously saved details such as the serial number, group code, group name, symbol, details and statuses. Users also have the option to edit and delete group information. Users can also search for any brand information. Additionally, users also create a new group by inputting the group name, code, symbol, details and status.
Import Group
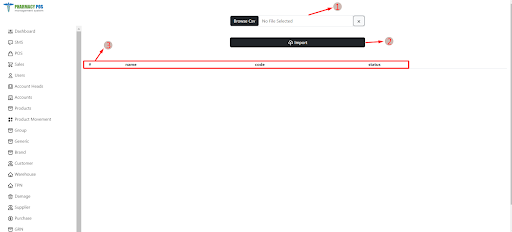
- Select browse CSV
- Import
- Text headers
- Serial number
- Name
- Code
- Status
If the user wants to import multiple inputs at once, they need to use import groups. They can navigate to the browse CSV option within the import group and select an Excel CSV file. After fetching the Excel file, the users can view the serial number, name, code and status. Once the user is sure about the information, they can click the import button.
Generic
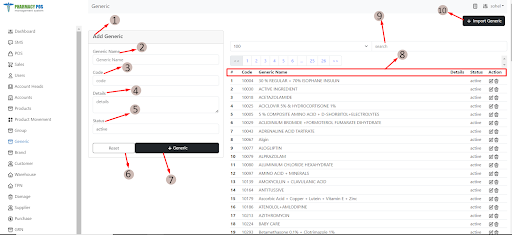
- Create generic
- Generic name
- Code
- Details
- Status
- Reset
- Add generic
- Text headers
- Serial number
- Code
- Generic name
- Details
- Status
- Action
- Edit details
- Delete details
- Search button
- Add import generic
The generic section presents previously saved details such as the serial number, generic code, generic name, details, status and actions. Additionally, users have the ability to edit and delete generic information. Users can search for any brand information. Users can also create a new generic by entering the generic name, code, details and status.
Import Generic
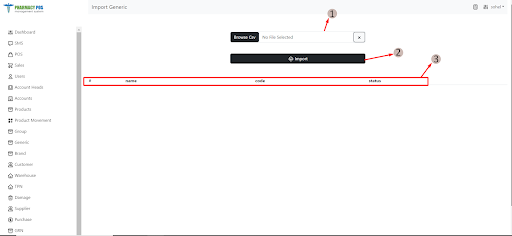
- Select browse CSV
- Import
- Text headers
- Serial number
- Neme
- Code
- Status
If the user wants to import multiple inputs at once, they need to use import generic. They can navigate to the browse CSV option within the import generic and select an Excel file, the user can view the serial number, name, code and status. Once the user is sure about the information, they can click the import button.
Brand
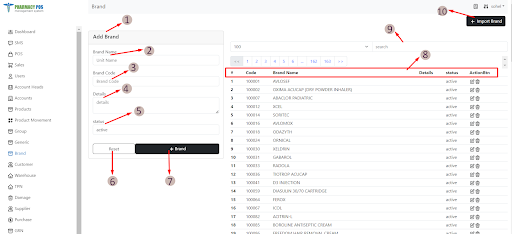
- Create brand
- Brand name
- Brand code
- Details
- Status
- Reset
- Add brand
- Text headers
- Serial number
- Code
- Brand name
- Details
- Status
- ActionBtn
- Edit details
- Delete details
- Search button
- Import brand
The brand section displays previously saved details including the serial number, code, brand name, details, status and actions. Users have the option to edit or delete brand information. Users can also search for any brand information. Additionally, users can create a new brand by entering its name, code, details and status.
Import Brand
- Select browse CSV
- Import
- Text headers
- Serial number
- Neme
- Code
- Status
If the user wants to import multiple inputs at once, they need to use import generic. They can navigate to the browse CSV option within the import generic and select an Excel file, the user can view the serial number, name, code and status. Once the user is sure about the information, they can click the import button.
Customer
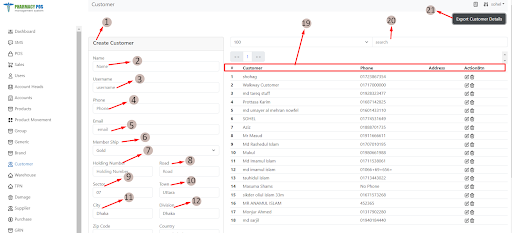
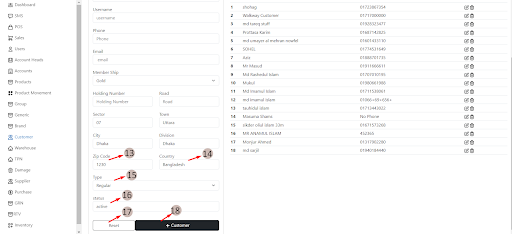
- Create customer
- Name
- Username
- Phone
- Membership
- Holding number
- Road
- Sector
- Town
- City
- Division
- Zip code
- Country
- Type
- Status
- Reset
- Add customer
- Text headers
- Serial number
- Customer name
- Phone number
- Address
- ActionBtn
- Edit details
- Delete details
- Search button
- Export customer details
The customer section displays previously saved details including the serial number, customer name, customer phone number, address, and action buttons. Users have the option to edit or delete customer information. Users can also search for any customer information. Additionally, users can create a new customer by entering its name, username, phone, email, member ship, holding number, road, sector, town, city, division, zip code, county, types and status.
Import Brand
- Select browse CSV
- Import
- Text headers
- Serial number
- Neme
- Code
- Status
If the user wants to import multiple inputs at once, they need to use import generic. They can navigate to the browse CSV option within the import generic and select an Excel file, the user can view the serial number, name, code and status. Once the user is sure about the information, they can click the import button.
Warehouse
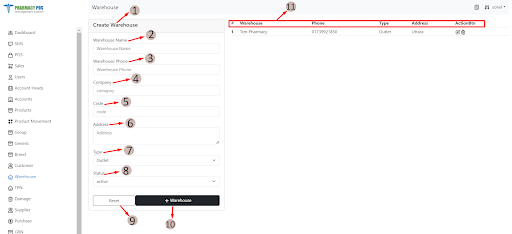
- Create warehouse
- Warehouse name
- Warehouse phone
- Company
- Code
- Address t
- Type
- Status
- Reset
- Add warehouse
- Text headers
- Serial number
- Warehouse name
- Phone number
- Type
- Address
- ActionBtn
- Edit details
- Delete details
The warehouse selection showcases previously saved details such as the serial number, warehouse name, phone number, Type, address and actionBtn. Additionally, users have the ability to edit and delete warehouse information. Users can also create a new warehouse by entering the warehouse name, warehouse phone number, company, code, address, type and status.
TPN
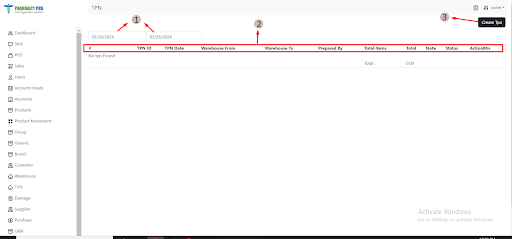
- Select Start date and end date
- Text headers
- Serial number
- TPN ID
- TPN date
- Warehouse From
- Warehouse To
- Prepared By
- Total items
- Total
- Note
- Status
- ActionBtn
- Create TPN
To transfer a product from one warehouse to another, users must utilize the TPN system. Within the TPN section, stored details including serial number, TPN ID, date, destination and origin warehouses, preparer's name, total items, total cost, notes, status, and action buttons are displayed. Additionally, users can select a date range for easier access to relevant information. Upon choosing a date range, users can conveniently retrieve the required details.
Create TPN
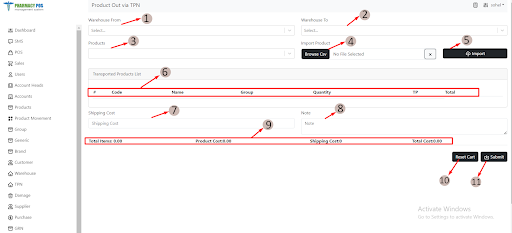
- Warehouse From
- Warehouse To
- Products
- Browse CSV
- Import
- Text headers (1)
- Serial number
- Code
- Name
- Group
- Quantity
- TP
- Total
- Shipping cost
- Note
- Text headers (2)
- Total items
- Product cost
- Shipping cost
- Total cost
- Reset cart
- Submit
Users also have the option to generate a new TPN by inputting the originating warehouse, destination warehouse, and product name. Upon submission, the system will display the code, name, group, quantity TP, and total. Users can then adjust the quantity, add notes, and include shipping costs as necessary.
If users want to import multiple inputs at once, they need to utilize the "import product" feature. Within this feature, they can navigate to the "browse CSV" option and select an Excel CSV file. After selecting the file, users can review details like serial number, code, name, group, quantity, TP, and total price. Users have the flexibility to adjust quantities, add notes, and include shipping costs as necessary. Once users are satisfied with the information, they can proceed by clicking the import button.
Damage
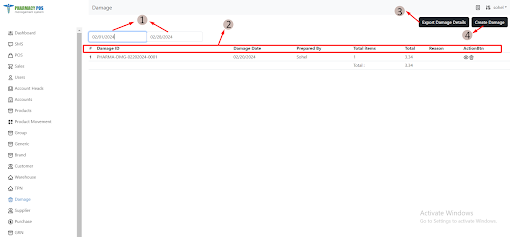
- Select start date and end date
- Text headers
- Serial number
- Damage ID
- Damage Date
- Prepared by
- Total items
- Total
- Reason
- ActionBtn
- Edit details
- Delete details
- Export damage details
- Create damage
The damage section showcases previously saved details such as the serial number, damage ID, damage date, prepared by, total items, total price, reason, actionBta. There is also an option for selecting a date range to obtain this information. After selecting a particular date range, the user can access all damage product information on damage ID, damage date, prepared by, total items, total price, reason and actionBtn. Users can also download all details of the damaged product.
Create Damage
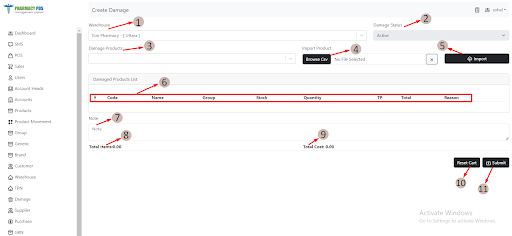
- Warehouse name
- Damage status
- Damage product
- Browse CSV
- Import
- Text headers
- Serial number
- Code
- Name
- Group
- Stock
- Quantity
- TP
- Total
- Reason
- Note
- Total items
- Total cost
- Reset cart
- Submit
If users want to create a damaged product, they need to navigate to the “damage product” option and search for the product name. Then, if the user selects the product name, they will see details such as the serial number, code, name, group stock, quantity, TP, total price, reason and note. Users have the ability to add quantity and reason as needed.
If users want to import multiple inputs at once, they need to use the “import product” feature. They can navigate to the browse CSV option within the import product and select an Excel CSV file. After fetching the Excel file, users can view details such as the serial number, code, name, group, stock, quantity, TP, total price, reason and note. Once users are sure about the information, they can click the import button. Additionally, users can add a damage product if they want by going to the damage product option.
Supplier
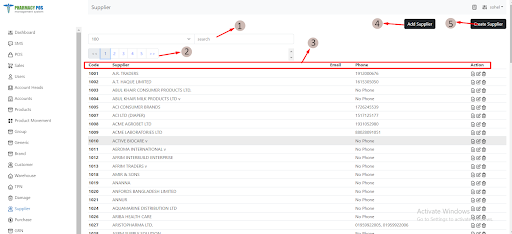
- Search button
- Navigation Bar
- Text headers
- Code
- Supplier
- Phone
- Action
- Ledger Details
- Edit Details
- Delete Details
- Add Supplier
- Create Supplier
The supplier section showcases previously saved details such as the code, supplier name, Email, phone number and Action. Users also have the option to edit and delete supplier information. Users can also search for any supplier information.
Supplier ledger
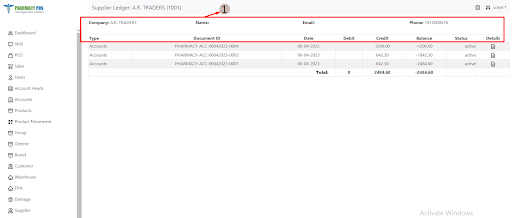
- Text headers
- Company name
- Name
- Phone
- Type
- Document ID
- Date
- Debit
- Credit
- Balance
- Status
- Details
The ledger provides details on when and in what quantities items were purchased from a supplier. Users can access information such as the company, name, email, phone, type, document ID, date, debit, credit, balance, status, and total price.
Add Supplier
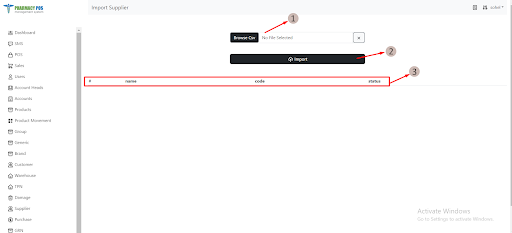
- Browse CSV
- Import
- Text headers
- Serial number
- Name
- Code
- Status
If the user wants to import multiple inputs at once, they need to use the add supplier. They can navigate to the browse CSV option within the import and select an Excel file. The user can view the serial number, name, code, status. Once the user is sure about the information, they can click the import number.
Create Supplier
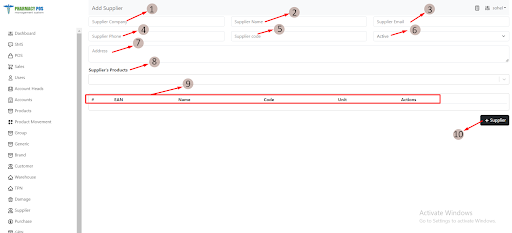
- Supplier Company
- Supplier Name
- Supplier Email
- Supplier Phone
- Supplier Code
- Status
- Address
- Suppliers Products
- Text Headers
- Serial number
- EAN
- Name
- Code
- Unit
- Actions
- Add Supplier
Users can create a new supplier by entering details such as the supplier company, supplier name, supplier email, supplier phone, supplier code, address, and supplier product. After submission, the system will display the code, EAN, name, and action for the newly created supplier.
Purchase
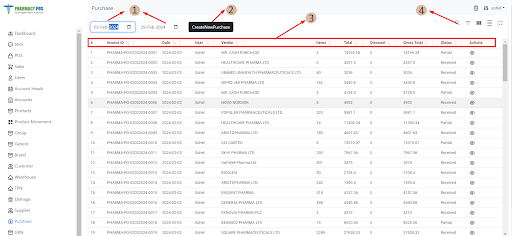
- Select start date and end date
- Create new purchase
- Text headers
- Serial number
- Invoice ID
- Date
- Biller
- Vendor
- Items
- Total
- Discount
- Gross total
- Status
- Action
- Search button
The purchase section displays saved details like serial number, invoice ID, date, vendor, items, total, discount, gross total, status, and action. Users have the option to search for specific purchase information using the invoice ID. Additionally, they can select a date range to access this information more conveniently. Once a date range is chosen, users can easily retrieve the relevant information.
Create New Purchase
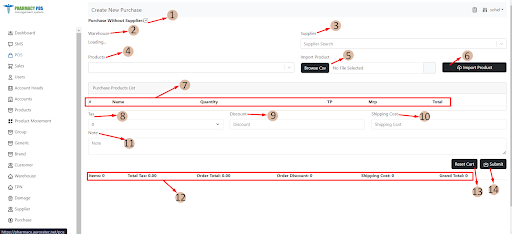
- Select purchase without supplier option. (Users can select the "purchase without supplier" option when buying products from various suppliers at the same time.)
- Select warehouse name
- Supplier search
- Input/ Search product name
- Import browse CSV
- Import product
- Text headers (1)
- Serial number
- Name
- Quantity
- TP
- MRP
- Total
- Tax
- Discount
- Shipping cost
- Note
- Text headers (2)
- Items
- Total tax
- Order total
- Order Discount
- Shipping cost
- Grand total
- Reset cart
- Submit
When a user needs to purchase products from different suppliers simultaneously, they can choose the "purchase without supplier" option. Users can create a new purchase by entering the warehouse, supplier, and product name. After submission, the system will show details like name, quantity, TP, MRP, and total. Users can then modify the quantity, add notes, and include shipping costs if needed.
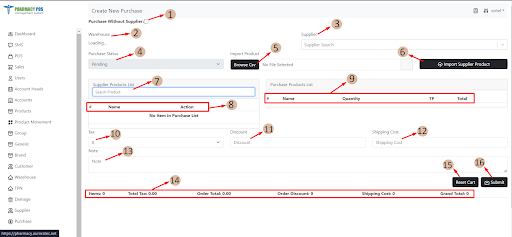
- Unselect purchase without supplier option. (If users are purchasing a product from a single supplier, they won't require a separate option for purchasing without specifying the supplier.)
- Select warehouse name
- Search supplier
- Purchase status
- Select browse CSV
- Import supplier product
- Supplier product list
- Text headers (1)
- Serial number
- Name
- Action
- Text headers (2)
- Serial number
- Name
- Quantity
- TP
- Total
- Tax
- Discount
- Shipping cost
- Note
- Text headers (3)
- Items
- Total Tax
- Order Total
- Order Discount
- Shipping Cost
- Grand Total
- Reset cart
- Submit
If users are purchasing from a single supplier for a product, they don't need the option to input the purchase without the supplier separately. They can just specify the originating warehouse, supplier and the product name. Upon submission, the system will display relevant details such as the product's name, quantity, TP and total. Users can then adjust the quantity if necessary.
If users want to import multiple inputs at once, they need to utilize the "import product" feature. Within this feature, they can navigate to the "browse CSV" option and select an Excel CSV file. After selecting the file, users can review details like serial number, code, name, group, quantity, TP, and total price. Users have the flexibility to adjust quantities, add notes, and include shipping costs as necessary. Once users are satisfied with the information, they can proceed by clicking the import button.
GRN( Goods Received Note)
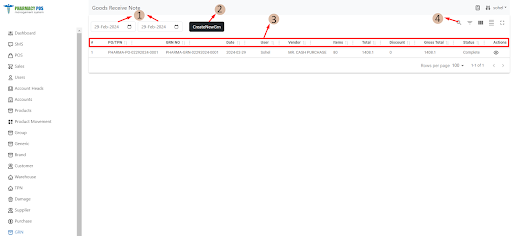
- Select start date and end date
- Create new GRN
- Text headers
- Serial number
- PO/TPN
- GRN no
- Date
- User
- Vendor
- Items
- Total
- Discount
- Gross total
- Status
- Action
- Search button
The GRN module displays all previously saved GRNs. It includes an option to select a date range to obtain this information. After selecting a particular date range, the users can access information on the serial number, PO/TPN, GRN no, date, user name, vendor, items, total price, discount, gross total, status and action. Additionally, users have the ability to edit and delete their information.
Create New GRN
When the user selects the “Create New GRN” option, they will see several choices, including Purchase order no, TPN no and Without PO.
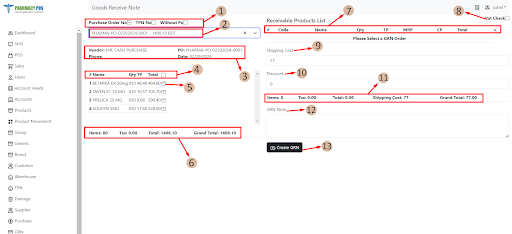
- Select purchase order no.
- Check the previous purchase information.
- View the supplier information
- Text headers (1)
- Serial number
- Name
- Quantity
- TP
- Select All product
- Select single Product
- Text headers (2)
- Items
- Tex
- Total
- Grand total
- Text headers (3)
- Serial number
- Code
- Name
- Quantity
- TP
- MRP
- CP
- Total
- Cancel
- Select Vat check option
- Shipping cost
- Discount
- Text headers (4)
- Items
- Tax
- Total
- Shipping cost
- Grand Total
- Write GRN note
- Create GRN
If the user chooses the “Purchase order no” option, they can view previously generated Purchases oder no. From These, users can select a specific order and proceed to directly create a GRN.
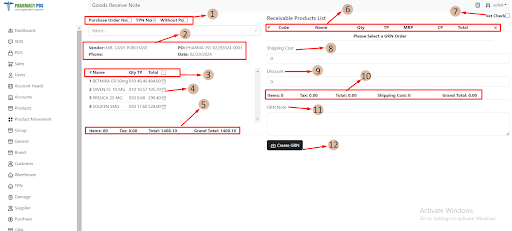
- Select TPN no option
- Check the supplier information.
- Text headers (1)
- Serial number
- Name
- Quantity
- TP
- Total
- Select all product
- Select single product
- Text headers (2)
- Items
- Tax
- Total
- Grand total
- Text headers (3)
- Serial number
- Code
- Name
- Quantity
- TP
- MRP
- CP
- Total
- Cancel
- Select Vat check
- Shipping cost
- Discount
- Text headers (4)
- Items
- Tax
- Total
- Shipping cost
- Grand total
- Write GRN note
- Create GRN
Similarly, when the user selects the “TPN” option, they can view previously generated TPNs. From here, users have the option to directly perform a GRN based on the TPN if desired.
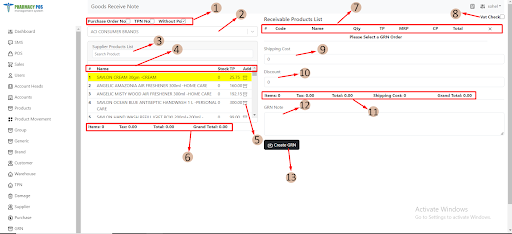
- Select without Po option
- Select Supplier name
- Select product name
- Text headers (1)
- Serial number
- Name
- Stock
- TP
- Add
- Select single product
- Text headers (2)
- Items
- Tax
- Total
- Grand total
- Text headers (3)
- Serial number
- Code
- Name
- Quantity
- TP
- MRP
- CP
- Total
- Cancel
- Select Vat check
- Shipping cost
- Discount
- Text headers (4)
- Items
- Tax
- Total
- Shipping cost
- Grand total
- Write GRN note
- Create GRN
Again, If the user selects “Without PO” they will be presented with supplier and product search options. They input the supplier’s name and the product’s name, then view details like serial number, code, name, quantity, TP, MRP, cost price, total price, shipping cost and discount. After inputting the quantity, they will see the total price. Users can adjust the price if needed and then create the GRN. The purchase is generated automatically so there is no need for separate creation.
RTV ( Return To Vendor )
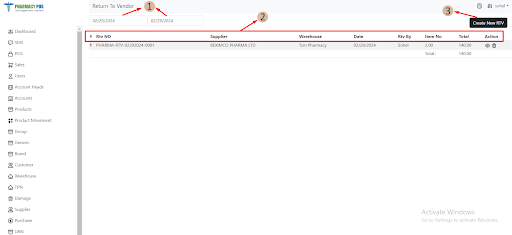
- Select start date and end date
- Text headers
- Serial number
- RTV no
- Supplier
- Warehouse
- Date
- RTV by
- Item no
- Total
- Action
- Edit details
- Delete details
- Create New RTV
The RTV process usually starts with a need to return goods to the supplier. This could be due to various reasons such as damaged items, overstocking, wrong shipments, or expiration of products. It helps businesses maintain good relationships with suppliers while minimizing costs and disruptions associated with returns. Users also have the option to select a date range to retrieve this information. Upon selecting a specific date range, users can access details such as RTV number, Supplier name, warehouse, date, RTV by, item number, total, and action. Additionally, users can delete any information as needed.
Create New RTV
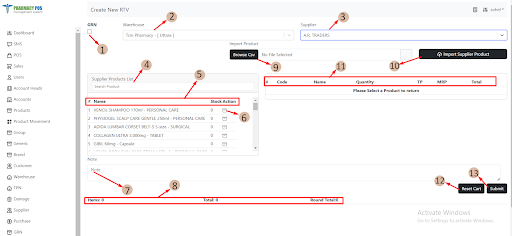
- Select GRN if users want
- Select warehouse
- Supplier
- Product name
- Text headers (1)
- Serial Number
- Name
- Stock
- Action
- Select single product
- Note
- Text headers (2)
- Items
- Total
- Round Total
- Select browse CSV
- Import supplier product
- Text headers (3)
- Serial Number
- Code
- Name
- Quantity
- TP
- MRP
- Total
- Reset cart
- Submit
Creating a new Return to Vendor (RTV) process typically involves gathering essential information such as the warehouse name and supplier details. Users input the supplier's name and then view all product names. After selecting a product name, users can view additional product information including code, name, quantity, trade price (TP), maximum retail price (MRP), and total price. Users also have the option to adjust the quantity if necessary. Depending on the platform, users may be assigned specific roles or permissions for accessing the system.
If users want to import multiple inputs simultaneously, they should use the "Import Product" feature. Within this option, they can browse for a CSV file and select it. The system then displays the serial number, name, code, quantity, TP, MRP, and total of each product. After reviewing the information, users can click the "Import" button to proceed.
Users can also RTV through GRN if they want.
Inventory
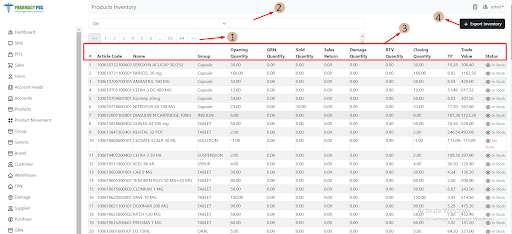
- Navigation Bar
- Search button
- Text headers
- Serial number
- Article code
- Name
- Group
- Opening Quantity
- GRN Quantity
- Sold Quantity
- Sales Return
- Damage Quantity
- RTV Quantity
- Closing Quantity
- TP
- Trade Value
- Status
- Export Inventory
This system tracks all product details, arranged by day, in the product inventory. Users can conveniently access daily information. The tracked details include Serial Number, Article Code, Name, Group, Opening Quantity, Goods Received Note (GRN) Quantity, Sold Quantity, Damage Quantity, Returned to Vendor (RTV) Quantity, Closing Quantity, Trade Price (TP), Trade Value, and Status. Additionally, users have the option to download all the information if desired. If the user wants information on a particular product, they can search for it.
Exports
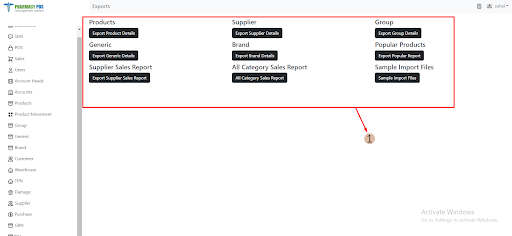
- Sorting
- Product
- Supplier
- Group
- Generic
- Brand
- Popular Products
- Supplier Sales Reports
- All Category Sales Report
- Sample Import Files
Popular Products
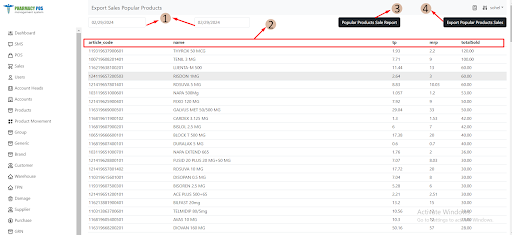
- Select start date and end date
- Text headers
- Article code
- Name
- TP
- MRP
- Total sold
- Popular products sale report
- Export popular products sales
In the popular product module, users can view a list of the best-selling items. They also have the option to access information about all popular products. Additionally, users can select a date range to view details such as article code, name, trade price (TP), maximum retail price (MRP), and total quantity sold for each product.This feature helps users understand which products are popular and how well they're selling during the timeframe they choose.
Supplier Sales Report
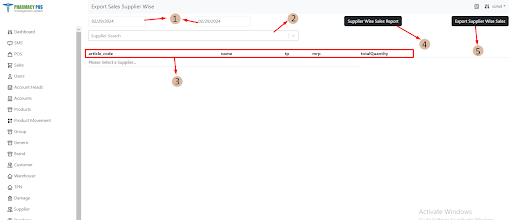
- Select start date and end date
- Supplier search
- Text headers
- Article code
- Name
- TP
- MRP
- Total quantity
- Supplier wise sales report
- Export supplier wise sales
The supplier sales report includes all supplier-related details. Users can choose a date range to view information like article codes, names, trade prices (TP), maximum retail prices (MRP), and total quantities sold.
All Category Sales Report
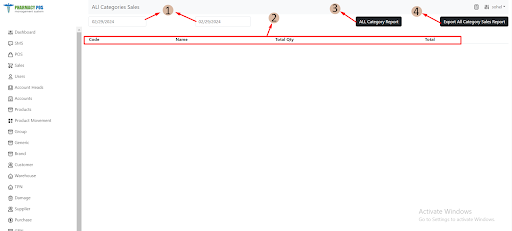
- Select start date and end date
- Text headers
- Code
- Name
- Total Quantity
- Total
- All category report
- Export all category sales report
The "all category sales report" gives a complete picture of sales for all types of products. It shows how much money each category made, how many items were sold, and their average price. This helps businesses make decisions about inventory and pricing. Users can also choose a date range to see specific sales details like article code, name, total quantity, and total price.